Our teardown of R2-D2 shows what’s inside this little droid with a big personality.
One of the hot new toys released in advance of the new Star Wars movie is R2-D2 by Sphero, the same toymaker that developed the BB8 for the 2015 Star Wars sequel called The Force Awakens. As with the BB8, R2 is controlled by an app you download and run from a smartphone. There’s no wireless charging; the robot recharges via a standard USB connection.
Our team recorded a video describing how to use the app, so we won’t spend any time on it here. Suffice to say the R2 robot has a lot more personality than the BB 8.
We’ll get straight into taking R2 apart. We’d have to say that taking the toy apart is a lot like disassembling an engine on a car in that you have to figure out the right sequence of steps. Get the sequence right and R2 comes apart readily.
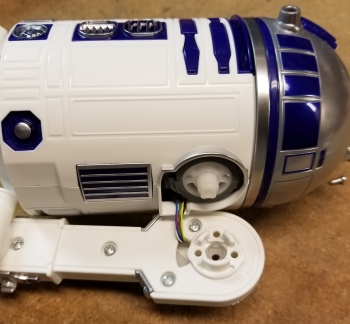
R2’s arms pivot to an angle when it’s time to travel. And the first step in disassembling R2 is to take off his arms. There’s a cover on the top portion of each arm which hides screws holding the arm to the pivoting mechanism in the shoulder. Remove the screws and the arm comes off. With R2’s arm off, the wiring to the servomotor in the base becomes evident.
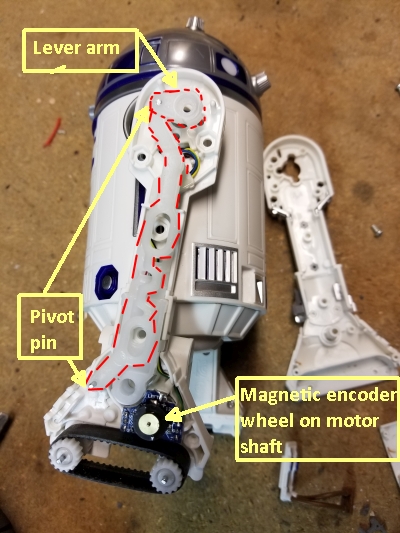
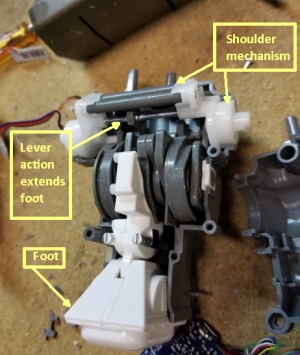
There is also a cover on the inner surface of the leg that pops off to reveal a long plastic lever arm between the pivoting mechanism in the shoulder and the foot. This lever arm keeps the foot in contact with the ground when the leg pivots to let R2 start moving around.
R2 has a servomotor in the base of each leg. The servomotor connects to the track drive through a gear train that reduces the motor speed and boosts the torque. The servomotor and the geartrain become visible by removing a small cover in the foot of the arm. It’s evident that the servomotor includes a feedback loop because a magnetic encoder disk and Hall effect sensor is evident on the motor shaft to provide feedback about the position of the motor shaft.
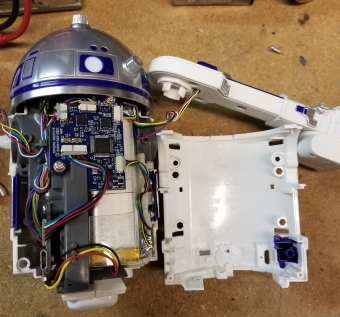

Once the arms are off you can remove R2’s main body panels. The cover for the cylindrical part of the body is in two pieces. One piece is held on with a couple screws and comes off pretty easily. The other cylindrical panel only detaches after first removing the top dome-shaped cover on R2’s rotating head. The dome covering comes off by rotating the head to get at two snap fits. The snap fits are rather tough to manipulate. Because our R2 wasn’t going to be reassembled, we Dremeled the snap fits off to remove the dome cover.
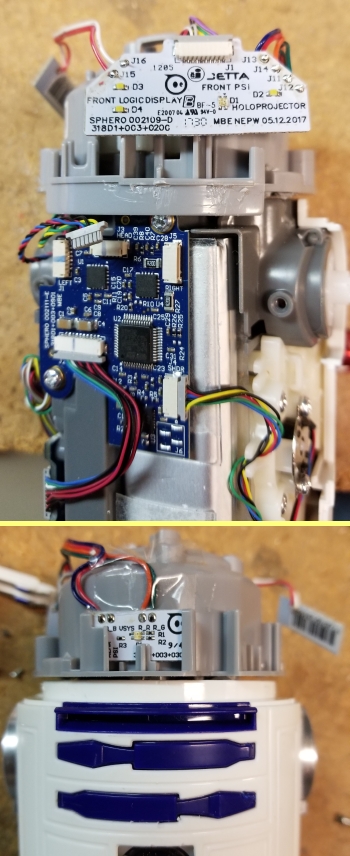
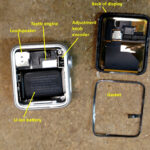
Once the dome is off, the other cylindrical side panel comes off to reveal, among other things, the speaker and Lithium-ion battery underneath it. With all the panels off you get a good view of the two main electronics boards and two smaller boards holding LEDs for R2’s blinking dome lights.

We’re down to the last few mechanical components that go into R2’s locomotion. There’s a piece to which the top dome panel attaches. It is fastened on with screws. Removing it reveals the servomotor that rotates the turret and a feedback encoder. The feedback encoder is interesting in that rather than being an incremental encoder, it is just a potentiometer. The motor controller senses the changing potentiometer resistance to decide how to rotate the motor shaft to rotate the turret.
There’s a second potentiometric encoder, like the one sitting in the turret, that sits on the main chassis of R2. This potentiometer provides feedback about the position of the foot that extends to the ground from R2’s body and slides along when R2 moves. The servomotor that moves the foot is the same one that angles the two arms into position to let the robot move around.
With the circuit boards moved from R2’s plastic frame, we are getting down to the robot’s main chassis. The chassis consists of two pieces fastened together with screws. Removing them gives us a clear view of R2’s foot. It sits on a lever arm that moves via cam action when the servomotor rotates the arms into position to let R2 move around.
And that’s finally it for R2’s mechanics. Now we move on to the electronics that control all the movement and sound effects.
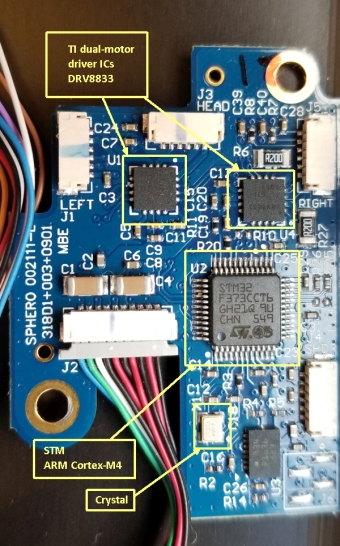
Two main boards hold most of the electronics with three other smaller boards on the turret and main chassis that hold LED indicators. One of the main boards holds an STM processor that consists of an ARM Cortex-M4 core together with a DSP, floating point unit, and a few other things. Near it sit two motor driver chips from Texas Instruments. Each driver chip can control two motors and can implement motor speed control through pulse-width modulation. That makes sense because there are four motors on R2. What’s notable about the motor driver chips, though, is that while some motor driver chips will handle velocity or position feedback signals, these don’t. So the STM processor runs the feedback calculations for all four feedback loops.
You need position feedback to move the turret or change the angle of the arms, and you probably need velocity feedback to handle the track motors in R2’s feet. We’re guessing that the feedback loop in the track motors is probably a velocity loop rather than a position loop because a velocity loop is easy to implement.
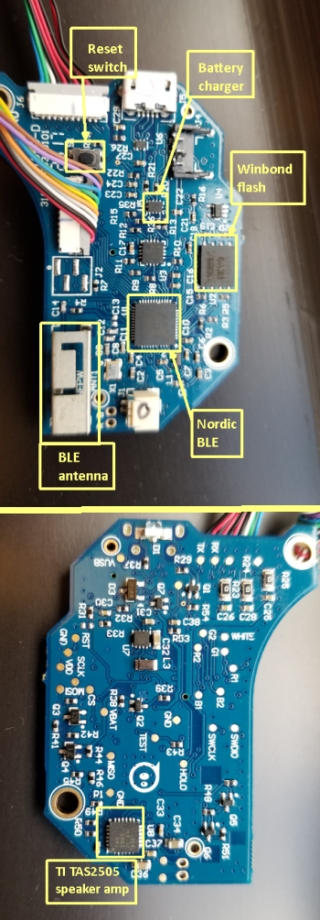
The other main board on R2 contains an audio amp chip to run the speaker and generate the sounds that give R2 a lot of his personality. It also contains the Nordic Bluetooth chip and antenna, a reset switch, and the battery charging circuitry and USB charger socket. There’s also what appears to be a flash memory chip from Winbond, though the markings are a bit scrambled and hard to make out. Now you might wonder what the flash chip does in that the Nordic Bluetooth chip already has 512 kilobits of flash. But the fact that this board holds the audio amp powering the speaker gives us a clue. We’d guess that the Winbond flash holds R2’s digitized vocabulary which gets fed out to the digital audio chip.
And there you have it. As Luke Skywalker might say, we’ve been through a lot with this little droid.



*Best Way To Remove Leg Screw Cover*
I am trying to clean the tread rollers as a lot of tiny hairs have wrapped around the shaft, I took it to my nieces home where she has a hair salon – big mistake ;^)
I have been able to remove some of the hair but a lot is still wrapped aaround the shaft so I thought that removing the arm to expose the roller would be the best way to make sure I could remove all of the debris.
I do not want to damage my R2 and was wondering the best way to remove the Leg Screw cover?
Thanks for the help.
When we take stuff apart for teardowns, we don’t have any intention of reassembly. So I am not sure we can help much. However, you might consider first taking the leg off the robot, then removing the plastic cover hiding the tread. R2-D2’s leg can be removed by taking out the screws in the shoulder. I believe there is a plastic cover that pops out to reveal the shoulder screws. Then you can get a good look at the screws holding the tread cover, which face the inner part of the leg. Once the cover is off the tread, it should be pretty easy to take it off and clean the rollers. Also, there is nothing special about any of the screws involved, so you should be able to use a garden-variety small phillips set on them. Hope this helps.
Sphero ‘s app claims that R2-D2 can tell the difference between humans and droids based on what the user chooses. Looking at the article, I don’t see how that can happen, unless the app just changes the behavior of the droid. You didn’t come across any visual sensors, right?
Correct. We did not find a camera. Perhaps that’s a feature of later versions…………..??
Yes the app lets you choose Human or Droid but the “human mode” is just it doing random things while it is plugged in, it doesn’t have a camera or audio detection (that I’ve seen). It does seem to be able to react to being picked up but I’m not sure what sensor triggers that.
Droid interaction actually does happen as there is some droid to droid communication and R2 can be the speaker for BB8.
Hi this is awesome. Do you have a manual to reassemble the R2D2? i am having a hard time doing it. Regards.
Nope.
Thanks for this guide it helped a lot to get him apart, my boy tried to push his legs back and they went past the built in stops. Reassembling the leg mechanism was very difficult to get right, I think i have as the movement is free in both directions and the leg drops and rises fine. ONly problem I am having is it seems out of sync, The middle leg raises then drops again in the upright position. Do you think the gearbox and position sensor connected to the leg mechanism needs to be in ‘time’? I thought it would calibrate itself but perhaps not.
I see that there is a reset switch inside which I am going to try and see if that sorts the issue.
Dear Mr Lee,
I would like to ask you something hoping you to help me. R2-d2 legs stucked
I bought it from Amazon 4 months ago. And I took it to Turkey for my son. During play on last sunday the legs stucked. Head is moving normally, the rubber bands under the feet is turning normally but legs stucked at little back in a way it can not stand in ballanced even turned of off. So reset turn on and off several times but the legs does not move like something is preventing or stucked by something. Also the middle leg is always inside and does not come out. So please advise what I can do. I did not try to open or anything yet before you say so. Please advise. My son is so sorry about his droid. That is the most valuable toy and friend for him. I would be more than appriciate if you can help me to fix it.
Hard to say what’s up without actually seeing it. But it sounds like there’s a problem with either the leg-positioning motor or the mechanical linkage between the motor and the leg. In both cases, the only way to get at these things and examine them is to disassemble the bot. The arms come off with the removal of shoulder screws, and screws hold the panels in place over the arm mechanism. But getting at the motors themselves requires taking off the rotating plastic head piece and the body panels. This is possible but tricky to do without causing severe cosmetic damage. Even if you managed to get this thing disassembled, I’m not sure where you could get replacement parts if one of the motors turned out to be bad. Sorry I can’t be of more help.
Just to validate, there is no way to hit that rest button from the outside correct? Seems strange they would have one and not give users a way to hit it just in case.
Fantastic teardown article, thank you. Would you be able to add pictures to pair with the descriptions of the encoders, potentiometer, and whatnot (middle part of the article)? That would be super helpful if so!
Hello!! I was looking at the note where they disarm the Sphero R2D2 robot. At the moment I am having problems with the droid and I am sure it is the battery. If they did, could you share with me the battery model information and dimensions? From already thank you very much. I greet you attentively.
What kind of r2d2 droid is that