By Tahmid
I have recently been using the Intel Edison for the Cornell robotics project team (which co-hosts the Intel-Cornell Cup USA competition). Building on my previous knowledge of embedded systems, I started learning to use and program on Linux. The distro used is Yocto (all information is available on the Intel Edison website).

One of the prototypes we worked on relied on using a wireless Playstation 4 controller for locomotion user interface. The concept of using an input device on Linux is not complicated, but can be a daunting task for someone new to Linux programming. I have decided to write this article giving an example of using an input device on an Embedded Linux platform. This demo application I am showing uses a USB mouse as the input device connected to the Intel Edison.
Prerequisite
I have assumed that you have a flashed Intel Edison board, know how to access the terminal (through the USB COM port, or through SSH) and have the Eclipse IDE installed and can program with it. Of course, if you don’t have the IDE, you can compile the code through the terminal and I’ll tell you how to do it at the end. If you are using a platform other than the Edison, details may change but the general idea is similar. Additionally, it is assumed that you have a basic understanding of C programming.
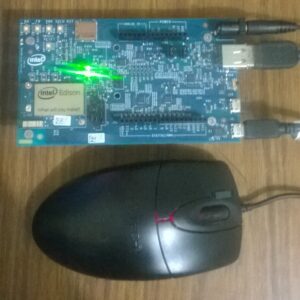
First thing to note when you connect the USB mouse is that the switch on the board (labelled SW1) must be switched towards the USB-A connector from the default position facing the microUSB port.
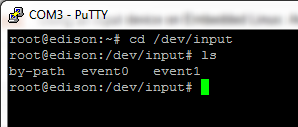
The device drivers in Linux abstract away the low-level nitty-gritty details of the interface with the input device, presenting an input through file descriptors that can be interfaced with as files. The input devices can be viewed and read from in the Linux environment just like files, as mentioned before. The input device appears in the /dev/input directory. Initially, before the mouse is plugged in, you can see that there is an event0 and an event1 file. Upon connecting the mouse, you can see an event2 file.


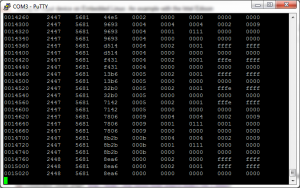
By reading the event2 file, you can read the mouse data. To dump data from the file, you can use the od command (man page:http://man7.org/linux/man-pages/man1/od.1.html)
For example, to view the output dump in hex format:

Hit Ctrl+C when you’re satisfied you’ve seen enough of the dump.
Now to make sense of this input, decipher it and meaningfully use it, I have written a simple C application. I’ll walk you through the process of developing it before I provide the code.
First thing to do is to go through these references as part of the kernel documentation:
https://www.kernel.org/doc/Documenta…vent-codes.txt
https://www.kernel.org/doc/Documenta…nput/input.txt
Additionally, you should go through the linux/input.h header file. You can find a copy here:
http://lxr.free-electrons.com/source…put.h?v=2.6.38
You can also type it into Eclipse, hit Ctrl on your keypad and left mouse click on the header file name to view the file itself.
From the kernel documentation and the input.h file, you should find that the data output happens such that every time an event occurs, it can be “fit” into the following structure (defined in linux/input.h):
Each event has a timestamp, type, code and value as you can guess from the input structure. Additionally, events are separated by EV_SYN type events which are just markers. EV_SYN is defined as 0.
You can read the file in a C program and then just print out the values separated as fields in the input event structure to confirm that and observe the different types of data as you interact with the mouse. You can limit the type of event as you interact with your mouse. To understand the meaning of the numbers you receive, peruse the linux/input.h file and the kernel documentation linked above. You will see a section describing the events:
You can compare these against the values you see to see if they make sense (they should!). Then, you can proceed to mold this to read the different codes, types, and values based on these. This is what I have done in my demo application, which should be commented enough for you to understand. (Obviously, if you have questions, let me know in the comments section!)
One last thing that I haven’t covered yet (but you may already know) is how to do the file read. I have used the low-level file IO functions open and read:
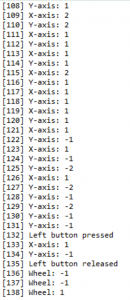
The demo application prints out messages describing mouse motion, wheel motion and left, middle (wheel) and right button presses. See Fig. 4 below.
A typical output is shown below:

Programming without the Eclipse IDE
As I have mentioned before, even if you don’t have the Eclipse IDE (which you should get), you can still program the Edison. There are a few ways you can do so.
Firstly, you can copy-paste the code from a text editor to the terminal (using PuTTY, mouse right-click is paste), or even write the code on the terminal. Additionally, you can use a program such as WinSCP to transfer a C file. Be careful with Windows files since lines end in a newline and a carriage return character, whereas on Linux, they end with only a newline character. The carriage return character will be displayed as ^M if you open the file with the text editor. Once the file is on the Edison file system somewhere, cd into that folder and compile it:
gcc -o <output name> <source file name>
eg: gcc -o mouse mouse.c
Then you can run it:
eg: ./mouse
I have attempted to make the code self-explanatory and provide sufficient background detail here for you to understand what’s going on. By changing the code and type checks, you can extend this to other devices. Hopefully, you’ll find this useful! Let me know what you think!
About the author
Tahmid is an engineer specializing in microcontrollers and power electronics. He is an active member on EDAboard.com forums for over eight years and has written several article around embedded systems, power systems, and analog circuits. You can find more articles from Tahmid here.


Where can I find the demo code? I can’t seem to find it on this page. It’s probably right in front of my face but for the life of me I can’t see it.
Thanks
I assume that print output is homework for reader.
Good job anyway!