Light Emitting Diodes (LEDs) are diodes that emit light when energized. LEDs can light a room now, whereas for decades they had been too weak to do much more than act as indicators. LEDs are fun to play with, and a fairly safe way to introduce kids to principles of circuits. There’s just a few things you need to know before you start connecting LEDs to batteries.
Selecting an LED: brightness and viewing angle

You should know how bright you want the LED to be (luminous intensity), what color (or if precision is needed, what wavelength), the viewing angle, and how physically large you want the LED to be. Brightness is actually a concern. Some LEDs are uncomfortably bright and some are meant to be very dim. It’s difficult to convey levels of brightness in an article, so you might want to familiarize yourself first by buying a few LEDs with varying luminous intensities. The example below includes a moderately bright LED at 605 mcd.
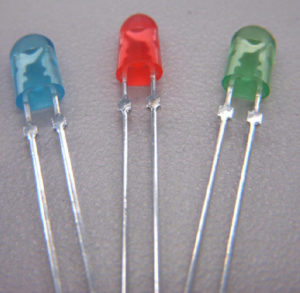
Look for an “indicator LED” or “through-hole” variety if you are working with a breadboard, PCB, or simply want the LEDs with wires you can attach to the resistor and battery with alligator clips (you don’t want to accidentally buy fixture-style LEDs). Luminous intensity is measured in millicandelas (mcd). As for viewing angle, not all LEDs can be viewed from all directions at 360 degrees like an incandescent light bulb. The viewing angle may not mean much for playing around with LEDs, but a 15-degree viewing angle is similar to only seeing the LED when looking at it straight on. Just like some LED TVs cannot be viewed that well from a recliner that’s placed too far off to the side of an LED TV, the indicator LED for your breadboard is exactly the same. Wavelength corresponds to color, but most datasheets will state the color directly, as well as include wavelength. Wavelength is handy if you are trying to match the exact color of another LED and know the wavelength, or if you are using LEDs to cure paint or nail polish. For example, curing a liquid that will only harden at a certain wavelength is not going to work nearly as well if the LED is emitting the wrong wavelength. Some nail polish will only cure with exposure to a narrow range of UV light, thus a curing lamp may not work at all for another manufacturer’s nail polish.
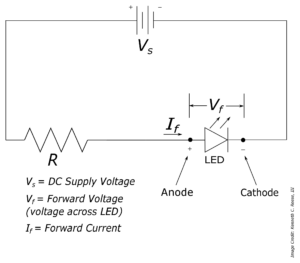
LEDs are polarity-sensitive. Much like a battery, they will not work if the anode (+) and cathode (-) are not biased properly. If an LED isn’t lighting up, try swapping it around.
Choosing the correct resistor
It is possible to light up an LED using a battery with no resistor at all, but if you don’t accurately match the LED to the rated voltage and current for the LED, the LED might be dim or too bright (and get hot), or the LED could even explode. Without a resistor to limit the current through the LED, the LED will inevitably wear out faster (grow dim and go out).
If you want a more permanent solution, you need a resistor in series with the LED to limit the current going through the LED. The value of the resistor is related to ohm’s law (V = IR). You need to know the power supply voltage (e.g., total battery voltage), the required voltage drop on the LED to make it light up, and the amount of current that should flow through the LED to turn it on.
The recommended operating current and voltage for the LED can be found in the LED’s datasheet. The LED’s operating voltage is usually referred to as forward voltage (). This is the voltage drop needed across the LED to get it to light up. The LED’s operating current is typically listed as forward current ().
Calculating resistor value
Use this formula to calculate the value of the resistor to be placed in series with the LED:
; where is the supply voltage. LEDs need direct current (DC), not alternating current (AC). A battery or AC power that’s converted to DC will work.
Calculating resistor wattage
Don’t forget about wattage for the resistor. If the resistor’s rating is too low, then it will get hot as it tries to deal with a heavier flow of current than it’s rated to handle. Watts are a unit of measure for power, therefore:
P=VI; where P is the wattage of the resistor, V is the voltage drop across the resistor, and I is the expected current flowing through the resistor.
The circuit for the LED is rather simple, and looks like that in Figure 1.

Example:
The Cree C4SMF-BJF-CR24Q4T2 is a blue, 4 mm through-hole LED that’s just a few cents at distributors like mouser.com. It’s bright enough for indoor work at 605 mcd. Per the values in Mouser Electronics’ parametric search for this part number, the forward current is 20 mA (or 0.02 A) and is 3.4 V. If we have a 9V battery (), then we can calculate that we need a resistor that’s 280 ohms:
The rated wattage of the resistor is:
P = VI = x 0.20A = 0.112
The rated watts for the resistor needs to be at least 1/10 w, but a more standard number is ¼ watt, thus we can use a quarter watt 280-ohm resistor. Higher wattage resistors will also work.

The required voltage drop on the LED to make it light up, and the amount of current that should flow through the LED to turn it on. The LED’s operating voltage is usually referred to as forwarding voltage (). This is the voltage drop needed across the LED to get it to light up.