Cozmo is a palm-sized robot from San Francisco-based Anki, the same company that makes an intelligent racing robot system called Overdrive that we’ve torn down previously.
Cozmo is actually an earlier version of an Anki robot called Vector. Vector has more capabilities in the area of artificial intelligence, thanks to its use of a processor that’s normally used to power smartphones. In contrast, Cosmo has a more basic main processor. So a lot of the computations that Cozmo makes actually happen in the cloud, thanks to a cellphone app that communicates with Cozmo and with Anki servers.
One of the intriguing aspects of Cozmo is what’s called a gamification system that lets you unlock more games as you complete more activities with. There’s also a remote-control mode where you can display on your smartphone what Cozmo sees through his camera while he roams around.
Cozmo has been built to interact with its users and has a small display screen that, in conjunction with audio effects, can be used to mimic human emotional responses. Anki even hired a former Pixar animator to help give Cozmo the feeling of an animated film character. The robot emits a diverse series of emotive chirps when someone is around, which it senses with its built-in camera. The result is a WALL-E-inspired personality that makes Cosmo seem more like a pet than a toy robot.
Cozmo’s built-in camera also lets it remember faces and recite names. It comes with three cubes that carry sensors and lighting that are used in various games and also let Cozmo plan paths.
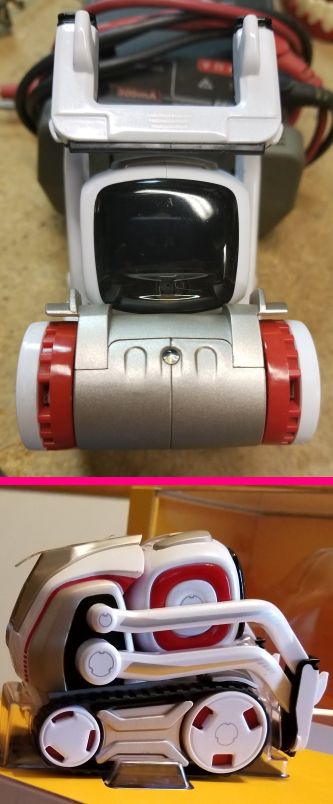
Anki obviously put a lot of thought into the mechanics of Cosmo. The robot disassembles pretty readily because Cosmo just uses ordinary Philips screws, no special screwdrivers required. We start by flipping Cozmo over to reveal the infrared light and sensor on the bottom surface of his body that is used for detecting objects. The first step in disassembling Cozmo
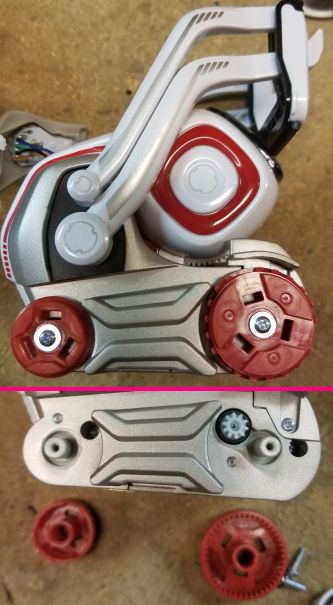
is to take his tracks off. That allows you to see that it is Cosmo’s bigger front wheels that are driven. The rear wheels just turn on their axles. Taking off Cozmo’s hubcaps exposes the screws holding on his wheels. Removing the wheels reveals a gear that engages with teeth on the inner diameter of the rear wheel and the screws holding the body together.
There’s a top piece that pops off the body to reveal the underside of the pushbutton assembly. Cozmo’s head is comprised of his display screen and camera that tilt up and down in one plane. A red fascia on the side of the rotating ‘head’ display hides the screws that hold the head enclosure together.
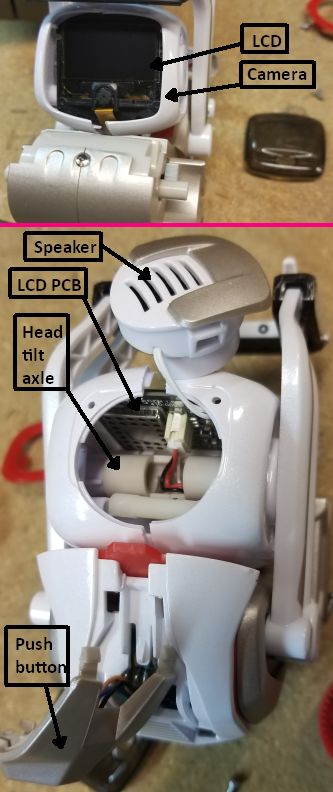
Removing the screws that hold the ‘head’ together allows you to remove the two pieces of the plastic head enclosure as well as the tinted front screen, revealing the display and camera.
The display is actually what’s called an in-plane switching LCD panel. This is considered a high-performance display because it has a wider viewing angle than the older twisted nematic LCDs. Cozmo’s speaker is on the back of his head assembly. Removing the speaker lets us see the gear used to rotate the head up and down. Also visible is the PCB comprising the head electronics to which mount the display and camera. Evident as well is the axle for the head rotation. Once you have the head removed, you can see a third last screw that holds the main body together.
To get Cozmo’s body apart, you have to remove the two arms on his lift mechanism. There’s two pieces to the front scoop on Cozmo with a rubber lip on the bottom of the scoop that acts as a cushion. The small arms are passive and just snap onto an axle in the body.
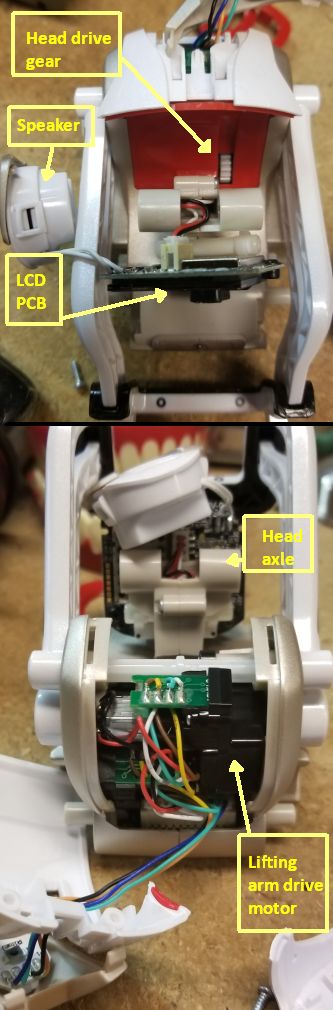
One of the large arms is also passive. It snaps into a circular socket and rotates. The other large arm is the drive arm.
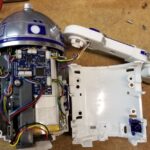
When you finally get the arms off Cozmo the two halves of his body finally come apart. Then you can see there are two ballast weights in the base that probably come into play when Cozmo does wheelie tricks.
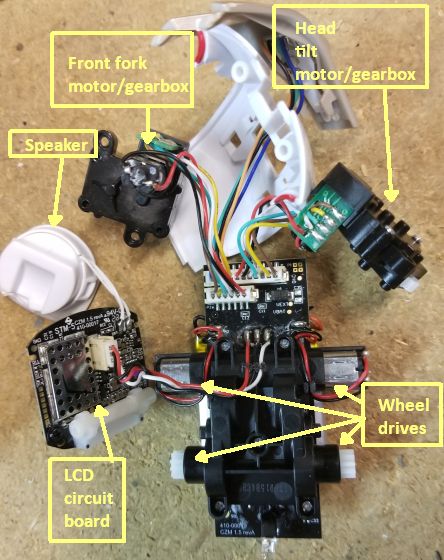
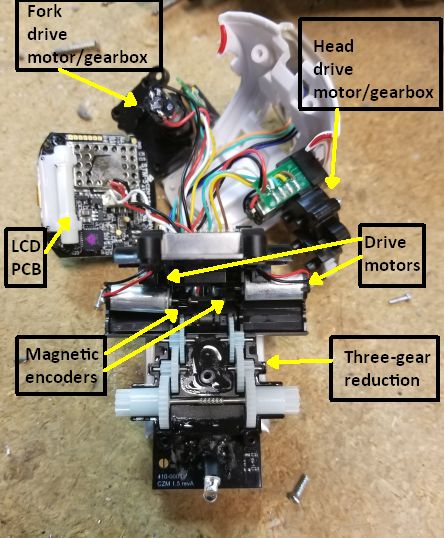
Finally, we remove the cover of the body holding the main drive motors and their drive train. We see that the drivetrain consists of three speed-reducing gears. We also see what appear to be two magnetic encoders mounted on the shafts of the motors. These are how the motor controller keeps track of the motor speed. Cozmo runs in what’s called tank mode – the two motors steer the robot by making the speed of one wheel different than the other.
That brings us to the electronics. We’ll start with the circuit board that holds the display screen. There’s a metal shield covering the main chip, a
Wi-Fi SoC from Chinese chip maker Espressif, and the Winbond flash chip from which it boots up. We looked for a Wi-Fi antenna on this board, but we didn’t see one, though it’s possible it could reside beneath the LCD on the flip side of the board. It’s also possible the wires used to connect the display board to the main board somehow double as antennas.
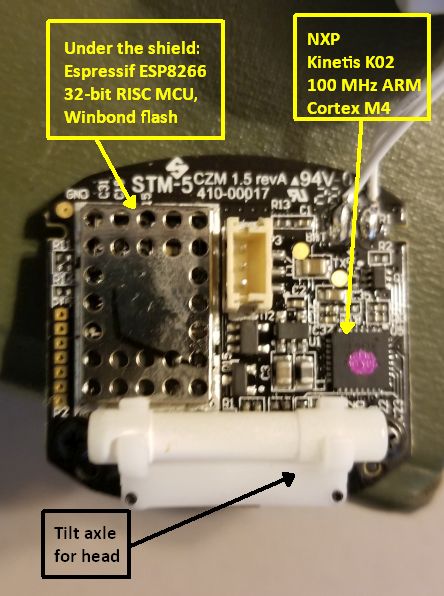
There’s a second chip on the board that is the brains of Cozmo. It is a Kinetis K02 microcontroller from NXP. It includes a 100 MHz ARM Cortex-M4 processor that includes some embedded flash and RAM.
The rest of the electronics resides on the main PCB that does double duty as the mounting frame for the drive motors and gearbox. The main IC we find there is a Nordic Bluetooth low-energy chip.
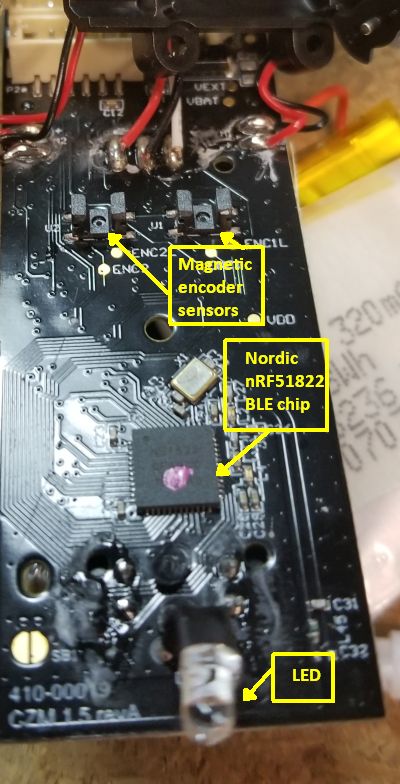
This device is built to do more than just handle Bluetooth transmissions. It includes a PWM and quadrature demodulator that are available for use by peripherals. So the Nordic chip almost certainly handles the motor controls necessary to move and steer Cozmo. That idea is reinforced by the fact that we didn’t find a separate motor controller IC.
The rest of circuitry on the main PCB consists of eight surface-mount devices which look as though they are drive transistors, and another small IC whose markings are ambiguous, but which seems to be there to manage the battery charging.
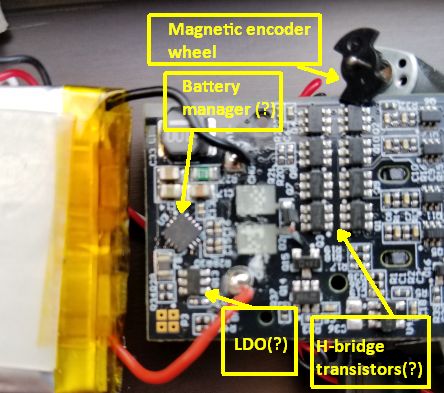
Each of the motors have what seem to be a magnetic encoder on the motor shaft. So we can gather from that the controller implements velocity feedback control on each motor. And there are two lobes on each of the two magnetic encoders, which would seem to mean that the controller can resolve the movement of the motor shaft down to one half of one shaft rotation. Given that we found three stages of velocity reduction in the gearbox, that would give plenty of control over Cozmo’s speed and steering.
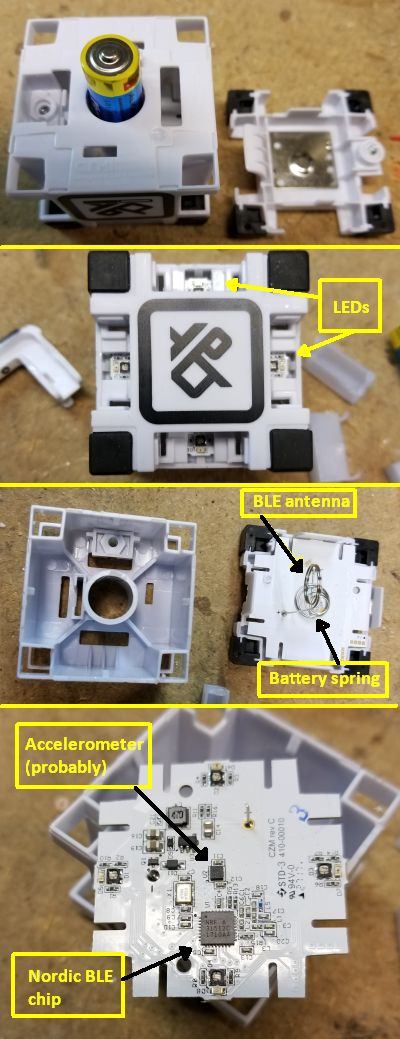
Finally, we can turn to the three smart cubes that come with Cozmo. Each cube has four translucent pieces that cover LEDs which flash and actuate for various games. The LEDs sit on a circuit board that also holds a terminal for the removable battery in the cube. To get at the circuit board, you detach one side of the cube as though you are changing the battery. The middle section unscrews to reveal the battery spring and an antenna for the wireless Bluetooth circuit, both mounted to the back of the cube’s circuit board.
Then the circuit board just lifts out to reveal the LEDs and Bluetooth chip mounted to the other side. The chip is also from Nordic. It is a specialized version of a Bluetooth chip often used in wireless mice. There’s no spec sheet publicly available for this chip so we can’t say much more about it. What’s also interesting is that we were expecting to find some kind of vibration sensor on the cube. That’s because some of the games you can play with Cozmo involve bashing a cube after it lights up. We found one IC that has ambiguous markings that could be an accelerometer. Also, it’s mounted exactly in the middle of the circuit board, which would be a strategic location for an acceleration sensor. So though we couldn’t identify who made the chip, we’re pretty sure it is, in fact, an accelerometer.
And that’s about it for Cozmo the robot, a predecessor to Vector.

So all the image processing and behavior happens with the arm cortex m4 chip? It’s a great teardown. I don’t have money to get a Cozmo. Was always curious about the process and electronics. Thanks a ton.
I bought Cozmo used for $50 and Vector 2nd hand (new in package) for $150. Deals are out there if you look for them.
They work excellently even after Anki going down and Dream Labs grabbing the rights.
Heard of Escape Pod? Open source server for Vector.
Do you know which manufacturer made it? Thank you
Anki
Where can i get the fork lift for cozmo
Since the manufacturer has ceased operations, your best bet might be eBay.
Will be relaunched by another company in October 2020
https://support.digitaldreamlabs.com/article/4-what-happened-to-anki
How many ram cozmo have?
Picture shouldnt process on that chip, I’m pretty sure cortex M4 is slave for esp8266 to drive motor
Hello awesome tear down of the Cozmo. But I’m wondering why they would need a second Processor when the ESP8266 MCU is fast enough to do everything? And can hold a lot of programming memory. There is no need for the other processor. Unless that is for updates or something because it is i think disabled. It does take a lot of power. The ble blue tooth module takes very little i guess that is why they are linked to the blocks. But still two micro processors.
I’m also wondering What chip he is using to make his sounds?
i think the reason for the second processor so like you said they add updates it works better or maybe its not disabled and it makes sure there isn’t to much work going on with the first one
rewind the post
Hi,
my advice, the esp8266 is internet object and the arm is for animation of robot.
I think that the attitude is programed in the arm.
The esp8266 put the answwer from cloud to the arm.
I think that the emotion is give to robot via the anki cloud.
often this case it’s present in a internet connected thing for vaccum machine etc.. there always a Soc with this ram and flash for the connection to the internet and a micro for animate the machine.
Can anyone point me to a schematic for the Cube?
Hello, have you find a schematics of cube? I
No schematic but you can open a cube by using a couple of guitar picks. There is a small barb that needs to be disengaged. Slide a guitar pick where the light is, straight down and center, where the diffusion for the lights are and gently pull. When the first two locations disengage move a pick to a third side and that should do it.
Do you think, based on the tear down, that Cozmo could receive a firmware modification that could make him as autonomous as Vector? Be freed of the constant tether of a smartphone? Somehow connect him to the cloud like Vector?
No. Vector has a Snapdragon processor that is much more powerfull than Cozmo’s RISC chip. Cozmo is incapable of running the firmware needed to provide Vector funtionalit.
Who knows the number for customer service for the anki products
Bad news about Anki:
https://www.therobotreport.com/anki-addresses-shutdown-ongoing-support-for-robots/
I took cosmos apart to solder wire on one motor that came loose. I now have a spring that is on the operation table that I did not see fall out during surgery. Anybody know where it goes?
He mentions the spring in this video (sorry, I can’t remember exactly when.)
https://www.youtube.com/watch?v=nyzLosnUBl8
The spring locate at both side of head rotation axis
Just had to tear down my cozmo to replace the battery. A tiny ball bearing dropped out of him! Any idea where it goes? Thank you!
Hiya can you tell me please. Changed the battery on Cosmo. But accidentally hit of 1 of the electrical components off where the counter weigh sits + right by where you solder the minus battery connection. It’s black small heptagon shape with 100 written on . Wondering how to attach it back on to PCB board because it wasn’t soldered to it.
Hi does anyone know how to attach a component on Cosmo that I accidentally hit of its black heptagon shape with 100 written on it and it is located on PCB board right next to where you solder new battery minus cable. ? It doesn’t look like this component was not soldered to board. Greatful for help. Kind regards jason
1 day i wont a cozmo
Hi, i have torn down my sons cozmo. The servo assembly that lifts gge arms up and down is not working. Gears are chewed up, and motor doesnt turn with AA battery. Number on it is 180604b4bcr any ideas where i coukd get one?
I am trying to take apart a anki cozmo block. For the life of me, I can’t remove the middle section to get to the circuit board. In your art “Cozmo Robot, a distant relative of Vector: Teardown” By Lee Teschler it reads “The middle section unscrews to reveal the battery spring and an antenna.
I don’t see how it can unscrew. I’ve tried pulling it apart; I don’t see where it is screwed together and I don’t see where to squeeze any clips to release it.
Please let me know how to perform this miracle. I would be forever grateful.
I am trying to fix it for my Grandson.
The problem is that all three blocks won’t light up all of the sudden, and they won’t sync with Cozmo. The batteries are brand new.
Thank You 🙂
Hello,
I hope you can help me. To the right of the two soldering pins for the charger is a resistor with 2 soldering points. What kind of building block is this? Mine burned. Is there a plan for that? Or can you name the part for me. I could send you a picture.
Thanks in advance.
Greetings Bernd
Hello there.
Could anyone help me with identification of the diode marked as D2 on the circuit board? It’s located under the battery. I’ve to replace it but don’t know the exact name or specs of it to get a replacement. Thank you.